In the first part of our Mac Mini Media Centre series we looked at Hardware and Connectivity. Now that the Mac Mini is hooked up to the HDTV it’s time to configure it for Media playback and install some essential software.
The first setup issue is screen resolution. If you’ve got a 1080P HDTV then it’s a simple as plugging in your Mac Mini and you’ll get a full 1080P desktop without issue. If you’ve got a VGA inout then you shouldn’t have a problem either. If you’ve got a 720P HDTV then you may have some tweaking to do to get a full desktop display. Most 720P tv’s are actually 1388*768 panels rather than the 720P resolution of 1280*720. The Mini will pump out a 1280*768 resolution which gives you two options. Live with that resolution and you get a black border around your desktop which is ugly. Alternatively, goto System Preferences and enable overscan. This will remove the border but instead you see half the dock and lose the menubar. Although this sounds bad in actual fact you will be using software like Plex most of the time which can cope well with this scenario so it’s not an issue.
If your not happy with this scenario then a final option is to use SwithResX. With this utility you can tweak the resolutions outputted by your Mac. However care must be taken as this software is basically (my understanding so could be wrong) a hack and it’s easy to set a resolution that your TV doesn’t support, so leaving your Mini displaying a black screen. Always select a resolution via System Preferences so that you can easily use the up/down arrow keys to pick another resolution that works. If you boot and you get a black screen there is advice on the ScreenResX website – good luck!

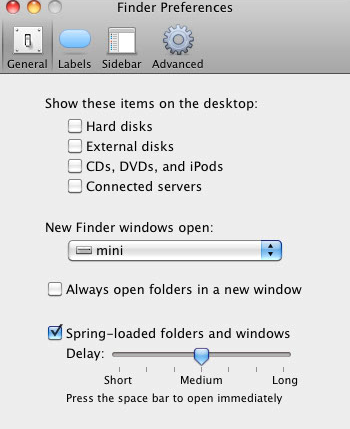
While we’re sorting out the desktop, there’s a couple of other worthwhile tweaks. I want the Mini’s desktop to be clear of any distractions. By default a Mac’s desktop will show external drive’s connected to the machine. To keep the desktop clear, open Finder, select Preferences and under the General icon ensure that all desktop items are unchecked. Speaking of the desktop, select a great background picture that will look good on the TV. Right click on the desktop and select Change Desktop Background or goto System Preferences and select Desktop & Screen Saver. You can pick a folder of pictures and have the system rotate them on a set time or when the Mac wakes up. Another great way of keeping your desktop fresh is to use DeskLickr which is free app that will connect to your Flickr profile, tag searches or a DeskLickr group and set the desktop picture. Unique and pulls up some real gems.
When your media is playing you don’t want to be interrupted or have the system kick of any scheduled tasks or software checks on the internet. Therefore, goto System Preferences and in Software Update disable Check For Updates. You should do similar for any other software that may be running – set checks to manual and every few weeks check for updates.
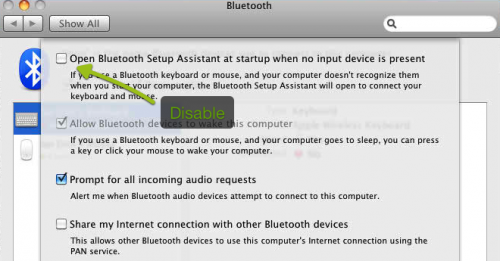
Another potential annoyance is Bluetooth, in particular when a device isn’t detected. In System Preferences select Bluetooth, click on Advanced and uncheck Open Bluetooth Assistant option.
With those out of the way it’s time to get some essential software installed. Remember this is primarily a media centre so I won’t be installing many of the popular Mac app’s.
For video and audio playback the key is codec’s. There are a variety of essential codec’s that should be installed to make the most of any digital content you own. Perian describes itself as the swiss army knife for Quicktime as it comes with almost all the codec’s you’ll need to make Quicktime your goto player. Perian enables support for the following:
- File formats: AVI, DIVX, FLV, MKV, GVI, VP6, and VFW
- Video types: MS-MPEG4 v1 & v2, DivX, 3ivx, H.264, Sorenson H.263, FLV/Sorenson Spark, FSV1, VP6, H263i, VP3, HuffYUV, FFVHuff, MPEG1 & MPEG2 Video, Fraps, Snow, NuppelVideo, Techsmith Screen Capture, DosBox Capture
- Audio types: Windows Media Audio v1 & v2, Flash ADPCM, Xiph Vorbis (in Matroska), and MPEG Layer I & II Audio, True Audio, DTS Coherent Acoustics, Nellymoser ASAO
- AVI support for: AAC, AC3 Audio, H.264, MPEG4, and VBR MP3
- Subtitle support for SSA/ASS and SRT
While this add’s greatly to the flexibility of Quicktime it also brings a couple of issues. MKV’s take a long time to load in Quicktime as it likes to know the total length of a movie before starting. This isn’t the fault of Perian but rather Apple in how they’ve built Quicktime.
One codec issue is AC3 support. Apple doesn’t fully support AC3 and to set it up isn’t trivial. This blog post on Record and Reverie details the steps to enable AC3 support but it should be noted that this won’t work with all receivers.
Another essential codec to install is Flip4Mac Windows Media Component for QuickTime. Catchy. This enables playback wma and wmv files in QuickTime and allows you to view Windows Media Content in your browser.
Despite all the codec’s we’ve installed, sometimes QuickTime just doesn’t cut it. That’s where VLC Media Player steps in. This is an open source multimedia viewer, streamer and convertor. To be honest I only ever use it for playback and then you look at the features that’s not a surprise. The only drawback is the shortage of developers which has stopped the development of a 64 bit version.
iTunes is a great app for music playback but Spotify is a great companion. Spotify allows you to stream music for free from a large music library. With collaborative playlists it makes for a great music client.
The majority of internet video content is encoded in Flash so installing the latest version of Flash is also required. One word of warning if your new to Macs. Flash on the Macs is inferior compared to the Windows version. It’s pretty CPU intensive and likes to use up a lot of RAM. This was the case when it was owned by Macromedia and the Adobe purchase hasn’t made much difference. You should also get the latest Silverlight plugin from Microsoft as there is a growing amount of web video that requires Silverlight.
The final two app’s (for the moment) are Xmarks and SuperDuper!. I use Xmarks to sync bookmarks amongst all my browsers and it makes sense to make those bookmarks available on the Mini. I use Sync Profiles in Xmarks to make the bookmarks bar unique to the Mini and also keep some bookmarks exclusively for Work and vice versa. SuperDuper! is my backup tool of choice and it’s easy to backup the Mini to the Drobo so that I have a full disk image backup in case I need to restore. The image is actually pretty small as all of the media is stored on the Drobo and there are very few app’s stored on the Mini.
So that’s the Mini setup. Almost. The next post will detail some specific setup options that I’ve chosen to do to help share iTunes libraries amongst machines and also make the most of the energy saving features on the Mac as I don’t want to run the Mini 24/7. Once that optional post is out of the way I’ll take you through the setup and usage of Plex and that’s when the real fun begins.
