Wanting to use a Mac as a Media Centre/HTPC? Then this is the guide for you. In the first of a series of posts we’ll describe how to hook up a Mac Mini to an HDTV. Future posts will show how to get the best out of the Mini, the utilities that we recommend and the great playback software available on the Mac but this post will concentrate on hardware and connectivity to your HDTV. We’ll also test some different methods to control the Mac Mini and some great software to get media onto your mac. The first question you may be asking – why a mac?
There are now a variety of technologies and hardware that will act as a media centre for your HDTV. If your a gamer then the Xbox 360, PS3 or the Wii can all act as good media centre machines. However you are limited to the codecs they support and navigating your own content via the software on the consoles which isn’t always the best. Another option is to use a fairly cheap Windows box as an HTPC. Asus and Acer do some cracking Windows machines for £200-£300 and Windows 7 is a great O/S for media playback, but for me it still doesn’t match OS X when it comes to features and stability.
Which Mac?
The natural choice for Mac fans is the Apple TV. This is a device which connects to your HDTV and allows for playback of your own media, rent/buy of HD films and TV via iTunes and a few other nice media features like streaming music, photo’s from other devices etc. However the Apple TV is £223 for a device which has wi-fi and a 160HD. Not ideal as agin it doesn’t support many codecs, although you can flash the Apple TV to install Boxee or other codecs. That leaves the Mac Mini.
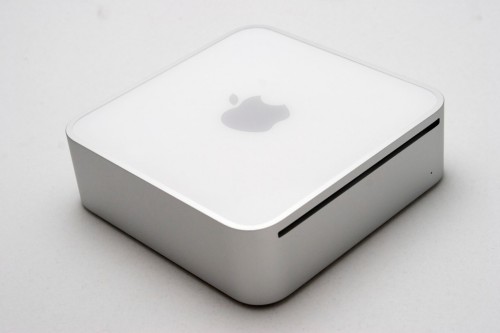
This is a fully featured PC that currently (Jan 2010) comes with a 2.26GHz processor, 2GB of Ram and 160GB hard drive. Coupled with the NVIDIA GeForce 9400M graphics card means it’s a great machine for playback of all music and video comeback up to 1080p. One other important feature – it’s tiny and most importantly for me is it’s silent. Drawbacks? Lack of Blu-Ray is disappointing when so many Windows machines come with that option and the price isn’t cheap. In the UK they are currently starting at £510. Not the cheapest but with a little bit of effort I think it’s one of the best options for a HTPC.
Video Connections
So you’ve bought the Mini – how do you connect it to your HDTV?
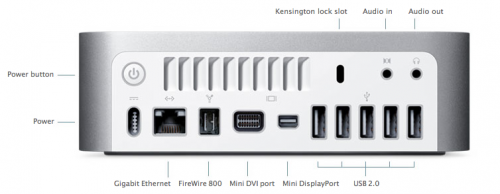
The Mini has two graphics ports – a mini DVI port and a mini DisplayPort. Apple has standardised on Mini DisplayPort in most of it’s recent hardware so it’s no surprise that the Mini is supplied with a Mini-DisplayPort to DVI adaptor. To connect your Mini to your HDTV you have the following options:
- DVI to DVI cable – plug into DVI port on HDTV
- DVI to HDMI cable – plug into HDMI port on HDTV
- DVI to VGA cable – plug into VGA port on your HDTV
- Mini-Displayport to HDMI adapter + HDMI cable – connect to HDMI port on your HDTV
Plenty of options and that’s obviously not all as the Mini-DVI port is there and can be used instead.
Audio Connections
That covers video but what about audio? None of the above cables will carry audio from the Mini-DisplayPort – thats what the Audio Out port is for.
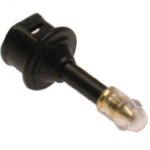
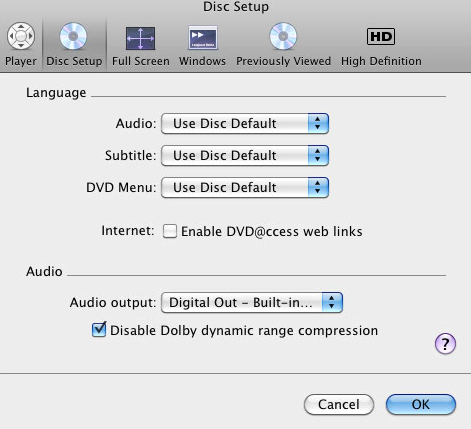
 This is a standard 3.5mm audio out port which also doubles as a digital out with the right connector. Search on Amazon or online for Mini Toslink to Toslink and you’ll find adaptors similar to the one pictured. Plug this into the Audio Out and you will now be able to hook the Mini up to an Optical in on your amplifier or TV via an Optical cable. This option allows for 5.1 sound to be delivered from the Mini. Note that to get 5.1 sound you must select 5.1 in each application. By default the sound will be output in digital, but digital stereo only. Taking DVD Player for example, goto Preferences and Disc Setup. make sure that Audio Output is set to Digital Out – Built In Output and check Disable Dolby Dynamic Range Compression. See screen below for example.

Later topics will cover the optimum audio settings for media playback software like Plex and Boxee. If you don’t have an optical in then you can make do with a 3.5mm to dual RCA (sometime called dual composite) cable which will give you stereo sound.
Input Devices
The Mac Mini is sold as a BYODKM machine – Bring Your Own Display, Keyboard and Mouse. Catchy, not! The display has been covered above. As for keyboards and mice, you can plug any USB keyboard and mouse into your Mini which isn’t ideal for a Media Centre device. Ultimately the Mini won’t need a keyboard and mouse day to day but for setting up, they are essential. I was lucky in that I had a spare Apple Bluetooth keyboard and mouse which once paired with the Mini has worked a treat. As already mentioned, for short term use any old USB keyboard/mouse will do. Another alternative is to set up the Mac Mini via screen sharing from another Mac. Easy to do as long as the Mac is already up and running.
Logitech do a few keyboards that work wirelessly and also include a touchpad but models that have been recommended elsewhere and are bluetooth include the diNovo Edge which looks gorgeous but should do at £139, the diNovo Mini which is a smaller keyboard and touchpad combo but still pricey at £119 and something you may overlook – the MediaBoard Pro for PS3 at £50. While it’s a bit bigger and less sexy than the other keyboards, it includes a touchpad and is far more reasonably priced. Note that these keyboards are built for Windows PC’s, not for Macs, so some keys are missing like command for example. I should also mention that Apple’s new wireless keyboard is tiny, gorgeous and would be ideal if only it had a trackpad as well. Maybe this year Apple?
Another option is to use an all-in-one remote like the Logitech Harmony range. The advantage with the Harmony range is that it will work with all your A/V equipment and also with your Mac Mini and it comes with profile support for some of the software you use on the Mac, like Plex.
Finally, if you use an iPhone then there are a few app’s that allow you to have total control of your Mini – this will be covered later in the series.
Network, USB, Firewire and Tuners
While the latest Mini comes with wireless N support I’ve chosen to hook mine up via ethernet. Despite the improvements over the years I’ve found ethernet far more reliable, less prone to variation which is important when streaming and it’s far easier to do Wake On Lan (WOL) with ethernet than via wireless. The final connection for me was to plugin my newly acquired Drobo via the Firewire 800 port on the Mini.
One last piece of hardware which many will consider is a TV tuner. Elgato’s EyeTV range has long been considered the best solution for Mac owners. I’m sticking with my Sky HD box for now, mainly for the live sport but over time I can see me using the sky box less and less so I may revisit this at some point in the future.
Boot Time
With the hardware sorted and your Mac Mini connected it’s time to boot, configure and install some software but that’s for a future post.

